|
Muzzle Blasts Online |
|
...for the muzzleloading enthusiast |
|
The muzzleblasts.com domain, subdomains, content, etc., are neither affiliated with the NMLRA nor its paper magazine Muzzle Blasts |
|
Muzzle Blasts Online |
|
|
|
|
|
|
Understanding Sight Adjustment

|
|
The author uses a depth gage to measure the height of an adjustable rear sight. |
These are elementary questions; but do you know exactly how far to adjust your sight to change the point of impact exactly one inch at 50 yards? This is another elementary question, and the answer is easy if you remember anything about high school math. Some of us do and some of us don't. The writer has shown several of our fellow NMLRA members how to adjust their sights and to calculate the required amount of sight adjustment to get on target at the distance they were shooting. Several of them suggested that I write an article for Muzzle Blasts, so here it is.
Mathematically, sight adjustment is a matter of simple proportions. Here's how math was taught in the 1930's.
Let A equal the required amount of sight adjustment for a given situation.
Let B equal the sight radius. (Distance between sights.)
Let C equal the desired change of impact at the target.
Let D equal the distance to the target.
Then A/B equals C/D, or A equals BC/D.
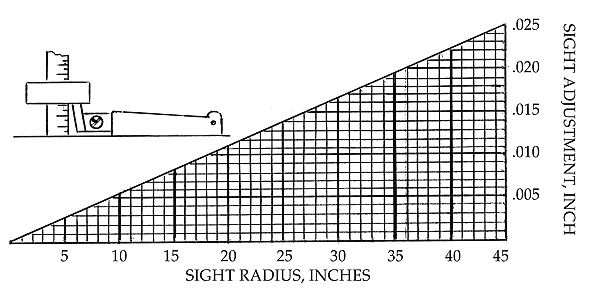
To change the point of impact one inch at 50 yards, C equals one inch, so the required adjustment equals the sight radius divided by the distance to the target, all distances being in the same units, (inches in this case). If the sight radius is 30 inches and the distance to the target is 50 yards (1800 inches), the required adjustment will be 30 divided by 1800, which is .0167, or slightly more than 1/64 inch. To simplify the matter, Chart A shows different sight radii and the amount of sight adjustment needed to equal one inch of movement at 50 yards.
Now let's sight in a new rifle. Suppose it is a longrifle with a 30-inch radius between non-adjustable sights. Let's say that several targets have been shot and that at 50 yards the shots are typically grouping about six inches low and two inches to the left. Required sight adjustment will be .0167, or a little more than 1/64 of an inch for each inch change in point of impact at the target. To raise the point of impact six inches we will have to either lower the front sight .100 inch or raise the rear sight by .100 inch. If both sights are altered, the rear sight will still have to be .100 inch higher than the front sight, if our preliminary tests are accurate. If the vertical point of impact is to be corrected by lowering the front sight, should the .100 be filed off all at once? No. Our calculations are correct, but most of us don't see the sights the same or shoot the same every day. Changing light, mirage, wind, and even the way we feel have an influence on where the shots hit. It is best to shoot on more than one day and under different weather conditions. Save all targets shot and mark them with the date, load, weather conditions, and height of each sight. I would lower the front sight by about 3/4 of the required amount, and then shoot several more targets on different days.
When it is certain how much additional adjustment is needed, clamp the barrel in a vise, use precision measuring equipment, and carefully file the sight to the required height, at the same time bringing it to the desired shape.
|
|
Chart A. Sight radius and amount of sight adjustment to change point of impact one inch at 50 yards. |
The writer once built and sighted in a Kentucky pistol with non-adjustable sights. After several targets had been shot the rear sight was filed down and left a little high to allow for final adjustment. Shooting with a one-hand hold, this shooter is not immune to an occasional bad shot, but the best eight or nine out of ten usually grouped within an area no larger then the 5 1/2- inch diameter bullseye of the 25-yard pistol target. After shooting two or three more targets, the groups still averaged a little high, as expected. Metal can't be put back after it is filed off, so the sights were left as they were until two or three more targets per day were shot on three additional days. When all of the targets were examined, it was found that one group was a little low, some were OK, and most of them averaged about an inch high. With a sight radius of 8 1/2 inches, .009 inch of sight adjustment would equal one inch at 25 yards. The barrel was clamped in a vise and .009 inch was carefully filed from the rear sight, being careful to keep the top of the sight parallel to the top flat of the barrel. Thereafter, when the shooter did his part, the groups were well centered on the target and the sight adjustment lasted through three changes of eyeglasses before the sights again needed to be fine tuned.
|
|
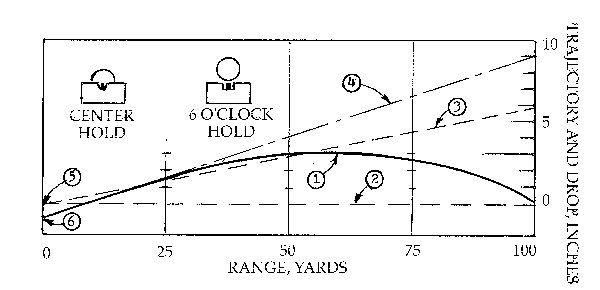
Chart B. Trajectory and lines of sight for six o'clock hold and for center hold. |
Should we sight in for the center hold or for the six-o'clock hold? Chart B shows the trajectory of a .45 caliber roundball propelled by 55 grains of FFFg as determined by the group centers of targets shot at different distances. The tests were made with the author's rifle, which has a barrel length of 42 inches. The lines of sight shown are for a front sight that is 3/4 of an inch above the center of the bore.
When sighted in at 50 yards for the six o'clock hold on the six-inch diameter single-bull target, the groups are also reasonably well centered in the 2.9 inch diameter bullseye at 25 yards. The balls are two to three inches above the line of sight at 75 yards, and group near the bottom of the single bull at 100 yards. Raising the powder charge to 70 grains raises the 100-yard point of impact about two more inches. For shooting large game, or for primitive targets that are larger than a baseball, it is easy to allow for the ball's being two or three inches above the line of sight, but it is very tricky to shoot small targets that are closer than 25 yards.
When sighted in for the center hold at 50 yards, all shots should be within an inch of the line of sight out to a distance of 60 yards. (This would happen only if the shooter is skillful enough to fire every shot through the same hole.) Beyond this distance the ball drops below the line of sight and is about six inches low at 100 yards. When sighted in as shown on the chart and using this load, the shooter can aim directly at small targets out to 69 yards, but the correct aiming point becomes uncertain at longer distances.
Which sighting system is best depends upon the shooter. For shooters with sharp eyesight, a fine-bladed sight along with the center hold will allow them to shoot a squirrel in the head and aim directly at small targets out to at least 50 yards. Older shooters with mediocre eyesight might do better using a coarse-bladed patrige-type sight and use the six o'clock hold. This system has the advantage that the ball travels above the line of sight so you can clearly see the object you are trying to shoot, as it is not covered up and hidden by the sights. This is an additional advantage when light conditions are poor, or when the target offers poor visibility.
Adjustable sights have the advantage of being capable of being fine tuned for any situation. They also have some shortcomings that are easily corrected. On some of the Thompson/Center style adjustable sights, the elevations and lateral adjustment graduations are so coarse as to be almost meaningless. Also, except for the screwdriver slots, there is no way to keep track of the position of the adjustment screws or how far they are turned. The writer uses a high-quality steel ruler or depth gage to roughly measure the height of the rear sight, and then uses the adjusting screws for precision adjustment. To keep track of the adjusting screw movements, a notch was filed on the edge of the screw heads; then the adjusting screws can be used like the knobs on a micrometer adjusted peep sight to dial in the elevation and lateral adjustment.
Here's how the adjustments work on the writer's favorite rifle. The sight radius is 20 inches, and one turn of an adjusting screw moves the sighting notch 1/32 inch, which is equivalent to three inches at 50 yards. When sighted in for the six o'clock hold at 25 to 50 yards, an elevation increase of 1/2 screw turn adjusts the sight for 100 yards when using the same powder charge. A predictable amount of screw adjustment can fine tune the sight for different types of targets at different distances. When the elevation screw is lowered one turn from its normal position the rifle is sighted in for the center hold. For lateral adjustment, the reference mark on the adjusting screw is especially useful. On some days when the shots are grouping either to the right or to the left, a look at the adjusting screw will tell if it has been moved from its normal position, or if the shot displacement is caused by wind drift, glare of sun on the sights, or simply by bad shooting.
References
2. Sam Fadala, Black Powder Loading Manual C-1982; DBI Books, Inc., Northfield, IL 60093
1. C. Kenneth Ramage, Lyman Black Powder Handbook, 1975; Lyman Products for Shooters. R #147,
Middlefield, CT 06445