|
Muzzle Blasts Online |
|
...for the muzzleloading enthusiast |
|
The muzzleblasts.com domain, subdomains, content, etc., are neither affiliated with the NMLRA nor its paper magazine Muzzle Blasts |
|
Muzzle Blasts Online |

|
|
|
|
|
|
Traditional Varnishes
by Eric Kettenburg
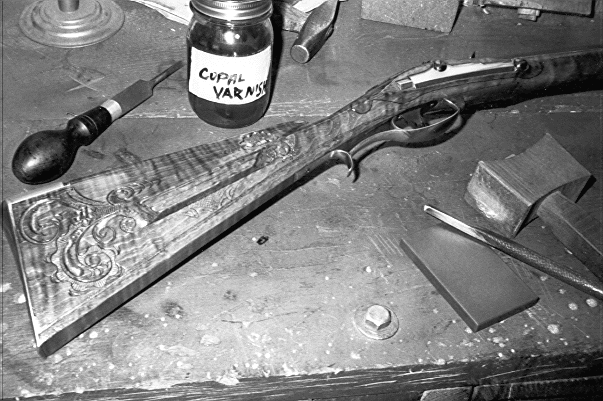
Although many modern gunmakers have replicated historical gunstock finishes by applying either store-bought linseed oil or one of the numerous synthetic blends that have saturated the market in recent years, those of us who approach our work with a strictly traditional bent usually opt to follow a different path. Prior to the mid-17th century, linseed oil and beeswax were mainstays of the European woodworking trades and served the required purpose - protection of the underlying wood surfaces - in a mediocre way; constant maintenance is a necessity when dealing with a straight oil or wax finish, for they are not particularly durable or weather-resistant. In addition, to apply oil and/or wax properly requires a great deal of time, which today has become increasingly precious and certainly would have been at a premium in the shop of any early American gunmaker.
Examination of surviving arms dating to the 17th and 18th centuries will often reveal that assorted finishing methods were employed and the archetypical oil/wax finish was only one among many. Unfortunately, most arms of this period that have survived the trek into the present day no longer possess their original appearance. In part, this is due to extremely hard usage during their active lifetime, and to the refinishing philosophy prevalent earlier in our own century. In all actuality, it is probable that various types of varnishes were much more likely to have originally seen hard service: they offer increased protection of the stock and faster build-up, while at the same time maintaining the ease of application that makes oil so appealing. I have used several types of traditional varnishes on my own arms with excellent results, the formulae having been gleaned from period texts (see bibliography) and through analysis of antiques that appear to have withstood the ages with their finish intact.
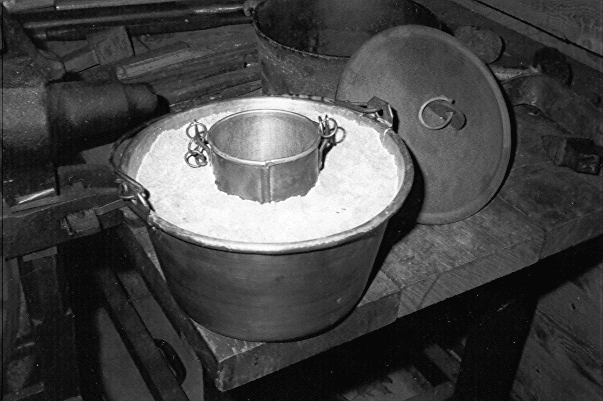
Before proceeding, it is imperative to note that varnish making often involves the use of heat in conjunction with extremely flammable substances. It is my belief that at no time should an open flame be utilized as a direct heat source. Using a small woodstove is preferable, and if a forge or other open flame must be used out of necessity, I recommend that an large iron plate should be suspended above the flame either from a tripod or on a framework; the radiant heat of this plate will be used rather than the flame itself. Clothing that can quickly be removed is also preferable, and a fire extinguisher should most certainly be present. Most important of all, however, is the use of a "varnish-pot" or sand bath.
|
|
The sand-bath. It will be beneficial to set aside several pots specifically for the purpose of varnish making. |
This is easily made (on a small scale) with a clean, empty one-gallon paint can and a coffee can. Place the coffee can inside the paint can and hold the top about one inch above the top level of the larger container; fill the remainder of the paint can with sand while keeping the coffee can centered within it. The purpose of this contraption is to ensure that the varnish, which will be inside the smaller container, is not exposed to excessive heat, and at the same time is heated slowly and evenly. It is very good practice to keep on hand a piece of wood or metal large enough to act as a lid in the event that the liquid within should ignite: the lid will quickly cut off the oxygen supply and smother the flame without damage to either the varnish or the varnish maker. Careful monitoring of the heat source should preclude any such incident, however. It will be found most beneficial to keep several such arrangements on hand as well as a number of small cast-iron pots (which are repeatedly mentioned in 17th and 18th century inventories). [Editor's note: As a further precaution, you might make your varnish outdoors, if possible.]
After addressing the making of a sand bath, it is logical for me to proceed to a description of the type of varnish that is most often created therein: namely, the oil-varnish. This type of varnish uses boiled linseed oil (sometimes cut with turpentine) as a fluid medium and yields a product of moderate drying time that is extremely tough and durable. Keep in mind that modern "boiled" linseed oil is not the same oil that was available to 18th-century gunstockers; but it is possible to modify it for our purposes. I believe the primary differences are these: (1) lead-based dryers (although extremely effective) are no longer used; (2) the dryers which are currently used are not cooked into the oil, but rather added to it as prepared liquids; and (3) the modern product is not exposed to heat and thickened, or prematurely oxidized, to the degree that the traditional version was. The essential practical differences between the traditional product and its modern counterpart are drying time and durability, and I believe that there is enough of a differential (especially for varnish making usage) to warrant the modification of the oil. Therefore, before proceeding to the actual making of an oil-varnish, it is first necessary to ensure that we are recreating the process using the proper oil! To create this "double-boiled" linseed oil, as I like to call it, it is necessary to make use of the previously described sand bath. Now, I have found it to be extremely difficult to reach any type of consensus regarding the traditional process involved in the making of boiled linseed oil, as everyone I have spoken to regarding the procedure seems to have their own opinion as to what is correct or most effective. Likewise, my research has uncovered only a large quantity of contradicting opinions and very little help. The method I will describe is the end result of combining my own "experimental archaeology" with various historical and modern references, and it does seem to yield the desired results.
After filling the inner container about two-thirds full, slowly bring the oil therein to a gentle boil. It is now necessary to add lead carbonate (i.e., "White Lead") which historically was used (when uncooked) as a translucent, white pigment in oil paintings. When this chemical is cooked into boiling linseed oil, however, it acts as a superb drying agent. However, please keep in mind the numerous hazards involved in handling this chemical: avoid skin contact and inhalation of any dust or vapor, and at all costs keep it far removed from pregnant women and children. The lead should be pre-dissolved before being added directly to the oil, the dissolution being accomplished by mixing one teaspoon or less of the carbonate with a few ounces of vinegar, which is then slowly stirred into the oil as it nears the boiling point. Because linseed oil alone is not particularly water-resistant, the vinegar will readily amalgamate with the oil, but will eventually be driven back out of the oil as a vapor during the boiling process. Constantly stir the oil as the lead solution is being added (a bit at a time), for it will most certainly begin to bubble and froth; after the drier has been completely mixed into the oil and it appears to have stopped foaming, skim any residues off the surface. When this has been accomplished, the oil may froth a bit more and should be a deep chestnut red in color. At this point, it can be removed from heat if the familiar consistency of oil is desired; or conversely, if you continue to boil the oil slowly, you will essentially begin to thicken and prematurely oxidize it (similar to "stand oil"). This will both darken the color and further cut down the total drying time. Once cooled, allow it to stand in a covered container for a day or two, and then strain through a cheesecloth; it can then serve either as a straight oil, or can be used to make a traditional oil-varnish. You may find, however, that the lead dryers are so effective that the oil will begin to gel within the container after a relatively short period of time. Not to worry! Traditionally, this oil was kept in plain iron pots and actually allowed to solidify: when the oil is to be used (either alone or modified as a varnish), it is traditional practice to render it very fluid once more by re-heating before application so as to ensure deep penetration into the wood.

|
|
A wide variety of traditional varnish constituents are currently available. |
Having covered the basic processes involved in the making of oil-varnishes, I'll proceed to describe a formula for the making of a very durable late-17th century varnish that was used throughout the 18th century and well into the 19th century. At the time it was considered to be a cheap and simple finish that was noted in period sources as being particularly well suited for usage on items exposed to the weather, and it has a beautiful dark amber color that complements many of the traditional stains used on maple, cherry, and walnut. It falls into the category of what were once called "plain brown varnishes," which are occasionally found in early trade inventories as well as in probate inventories of gunsmiths and other woodworking craftsmen. In short, it is a superb long-oil varnish for use on virtually any type of American colonial firearm that is as easy to use as oil alone and as easy to repair as well.
|
4 oz. good-quality rosin 4 oz. gum benzoin 1 cup to 1 pint turpentine |
| Grind the resins with a mortar/pestle until finely powdered. Heat the oil and turpentine in a sand bath until the desired temperature is obtained, and slowly add the resins while stirring constantly. When they seem to be dissolved, remove from heat and allow to stand (covered) for a few days before straining through a coarse piece of linen or cheesecloth (even coffee filters work!) into the storage container. Cork tightly. |
A slightly different type of oil-varnish was also used quite often. It involved the use of high temperatures - around 350 degrees F - to actually liquefy the resins themselves, at which point boiling oil at an equally high temperature was slowly poured into the resins and thoroughly mixed. The "Genuine Receipt For Making The Famous Vernis Martin," first published in 1776, details a fixed-oil varnish similar to what I am describing. At first it may seem ridiculously complicated, but it illustrates quite well the difficulty and dangers inherent in this process. Apparently various copal or amber resins were frequently used, and the resulting varnish was well respected as being both beautiful and overwhelmingly durable. The chosen resin is melted in either a pot or in the sand-bath, and the oil is heated concurrently in a separate pot. High heat is used to melt the resins until fluid, at which point the boiling oil is very slowly added to them. It is imperative that both resins and oil be maintained at a very high heat both before and during the mixing process, and that they be constantly stirred. I've had luck making copal-based varnishes as described above, although I'm not really sure whether or not there is enough of an advantage over the "Common Brown Oil-Varnish" previously listed to warrant the extra effort. Due to the somewhat tricky and laborious processes involved when dealing with this type of varnish, I believe that most early American gunmakers would have been more likely to purchase rather than manufacture it themselves.
Another type of finish that was very occasionally (and arguably!) utilized within the gunstocking trade is the spirit-varnish, named for its use of alcohol and/or turpentine as the fluid medium. A spirit-varnish is very quick to dry, therefore allowing the application of several coats in the course of one day. Typically, spirit-varnishes tend to possess a higher gloss than oil-varnishes; however, most finishes of this type are not nearly as weather resistant as an oil-based finish and will of course break down under continuous exposure to solvents. Much of this information (concerning spirit-varnishes) is included for the purpose of education only, as I personally would much prefer to use an oil-varnish on an arm that is to be frequently used in order to guarantee durability. It may have been acceptable to 18th-century customers to face some cracking or crazing of the finish after a few years of hard use, but our modern minds certainly gall at the idea!
A sand bath can be employed in the making of a spirit-varnish in order to speed things up a bit, although the utmost caution must be exercised here. It is absolutely crucial that the fluid not be heated much beyond the boiling point. Also, some spirit varnishes are much more durable than others, so it is very important to ensure that one is used that will provide a good degree of protection when considering the hard usage typical to a firearm. It would not be advisable to choose a varnish made from what might be considered an extremely high-gloss, "hard" resin, for in the absence of an oil base to provide elasticity, the flexing of the underlying wood surface caused by repeated exposure of the firearm to changes in temperature and humidity would very soon force the overlying varnish to "give" by forming a myriad of tiny cracks covering the surface of the piece. This would be most undesirable, although it is typical of many antiques.
Frequently, mention is made in the aforementioned sources of what was at the time called "Violin varnish," a generic term that apparently was applied to many different formulations and likely was used as a descriptive title to indicate the color of the varnish. This also is sometimes found in shop inventories of various woodworking tradesmen, and modern tradition, for better or worse, holds that some rifles made in Pennsylvania's Lehigh Valley/Bucks County area were originally coated with this type of varnish. Examination of surviving original arms that appear to retain their 18th-century finish would apparently offer some credence to this theory. Historically, Violin varnish by definition was tinted a reddish-amber color, and while there are numerous extant formulas for the making of such a finish, only a small handful of these would be of the type suitable for use on firearms. The two types I will describe offer a fair degree of durability while allowing very quick build-up of the desired finish, and are especially suitable for use on arms where incised carving and/or very low relief carving is the norm: once again, quite typical of the Lehigh Valley and Bucks County schools of gunsmithing. The following formulations have (like the oil-varnish recipes above) been adapted from several different period sources and have worked extremely well for me. They are not overly "hard" finishes in that they make use of turpentine and/or soft resins to provide a good deal of flexibility, and application over a traditional aqua-fortis stain on figured maple will yield an extremely beautiful, distinctive appearance.
|
1. A Common Violin Varnish
1/2 pint alcohol
|
| Begin by gently heating the alcohol and turpentine in the sand bath, and slowly stirring in the powdered copal and mastic. When most of the resins appear to have dissolved, very slowly add a slight amount of powdered dragon's blood and pause to check the color. Continue adding dragon's blood until the desired color is achieved, then remove from heat and allow to cool while periodically stirring. Let sit in a warm place (in sealed container) for at least one week, shaking frequently, and then strain through a fine cheesecloth and cork tightly. |
While this may seem to be somewhat complicated, it is in practice not overwhelmingly so. If natural pigments are unavailable, it certainly is possible to use alcohol-soluble aniline dyes to obtain practically any color that you want. This is certainly not a historically accurate practice, and I have no idea how the addition of anilines affects the overall quality of the varnish. I have strong doubts as to the durability and color-fastness of aniline dyes; however, I think that the subject at least warrants mention if only to serve as a mild warning: better to stick to traditional dyes when dealing with traditional varnishes!
After the stock has been stained, the first two or three applications of this varnish (often used in a much-thinned state) can be quickly applied to the stock with either a rag or brush; do not allow an excess to build up, and when complete coverage has been attained, set the stock aside to dry. I would recommend allowing the first coats to dry for at least for four to six hours apiece. Following these initial applications, a decent "rubber" needs to be made and used properly. Basically, this is a two-piece cotton or linen pad constructed in the following manner: an piece of cloth about ten inches square is folded or wadded to form a small pad roughly three inches across. This wad is considerably dampened with the varnish, and is then wrapped in a second piece of cloth of the same size. The wrapping is designed so that the bulk of the material can be grasped in the palm while one or two fingers will exert pressure upon a smooth portion that will be in contact with the stock. Pressure is exerted upon the wad in order to force varnish through the outer layer in a smooth and controlled manner, and sweeping, circular motions are used to apply the varnish to the stock in very thin layers. Keep the pad moving at all times and try not to repeatedly go over the same areas; these "gloss-coats" will very quickly dry and successive coatings will build up a lustrous polish. As with the oil-varnish previously mentioned, the assembled gun can then be maintained with a beeswax/neatsfoot oil/tallow mix.
Another traditional finish that warrants mention here and that falls under the classification of a Violin varnish is based on the use of Seedlac. Seedlac is cut to various degrees, much as shellac is; however, it is much more resistant to wear and tear (especially moisture!), while maintaining a beautiful dark-red coloration.
|
8-10 oz. seedlac |
| The alcohol is gently heated in the sand bath, and the seedlac is slowly stirred into the fluid until most of it appears to have dissolved. This is then removed from heat, placed in a sealed container, and allowed to sit in a warm place for at least one week, shaking frequently. It is then strained through cheesecloth and corked tightly. |
This varnish is applied in exactly the same manner as the previously described spirit-varnish. I don't believe that either of the two has any real advantage over the other, although I've found that the addition of an ounce or two of soft copal resin will help to increase the long-term durability of this product. Judging from the numerous extant formulae based upon the use of seedlac, it was quite common to fortify it with the addition of one resin or another. Both of these Violin varnishes will approximate a four- to five-pound cut; this is essentially a heavy-bodied (or high resin/solvent ratio) mix, and if thinning is desired, then it is certainly acceptable to do so. Usually, the first few coats are thinned down and heavily applied for the dual purposes of acting as a sealer and filling the grain, while subsequent applications make use of the thicker cut much more sparingly. Also, traditional woodworking practice relies heavily upon the use of either shellac or seedlac as a sealer under various types of other varnishes, both oil-based and spirit-based. I have often used this particular seedlac formulation for this purpose with good results. It also helps to add a bit more amber coloration to the underlying wood stain, and that certainly does enhance the overall appearance of the stock.
The beeswax/neatsfoot oil/tallow mix which I recommend to use as maintenance on the finished gun is made by heating pure beeswax (no turpentine or solvents!), tallow and neatsfoot oil together (in the sand bath) and allowing to solidify to a thick grease. The ratio depends upon the season: more oil in winter to keep fluid, less in summer to avoid runniness. This can also be used as a patch grease or leather conditioner, and for other purposes, so it is a good all-purpose mix to keep on hand. Mink oil can also be substituted for neatsfoot oil if desired and may offer increased weather resistance. The real advantage to using this mix as maintenance/protection of the completed arm is its ability to protect both wood and metal surfaces without leaving any sticky discoloration on the metal.
Beginning with the birth of European varnish
making in the late 16th century, each tradesman incorporated his own notions
of what would comprise the "perfect" varnish, and consequently there now
exist formulae beyond count, each striving to outdo or improve upon the
other. The three varnishes I have chosen to use and describe are merely
a drop in the proverbial bucket, but they are simple, cheap, and very effective
in the context of historical gunsmithing. There are obviously many other
modern finishes that can be used for the protection of gunstocks, and of
course they were developed primarily for the purpose of improving on the
old, traditional varnishes. However, if you choose to follow the faded
footsteps of tradesman who spent their lives laboring to marry function
with the beauty of the gunmaker's art, I believe there can be no more fitting
tribute than to utilize all the work methods of their trade, mundane
though they may have seemed to the original practitioners.
Bibliography
Chatfield, H. W. Varnish Constituents. London: Leonard Hill, 1947.
Eklund, J. The Incompleat Chymist... Washington, DC: Smithsonian Institution Press, 1973.
Mussey, R.D. The First American Furniture Finisher's Manual... Mineola: Dover, 1987.
Oughton, F. The Complete Manual of Wood Finishing. New York: Stein & Day, 1983.
Roubo, J.A. L'Art du Menuisier. Paris, 1769-1775.
Sheraton, T. The Cabinet Dictionary of 1803. (Reprint.) New York: Praeger, 1970.
Tingry, P.F. The Painter's and Colourman's Complete Guide. Philadelphia: E.L. Carey, 1831.
Watin, J.F. L'Art du peintre, doreur, vernisseur. Paris: Durand, 1776.
Sources of Materials.
Garrett-Wade Woodworkers Supply
161 Avenue of the Americas 1125 Jay Lane
New York, NY 10213-0459 Graham, NC 27253
Williamsburg Art Materials Gamblin Artists
Colors Co.
800-293-9399 503-235-1946
RR 1 Box 465E PO Box 625
East Meredith, NY 13757 Portland, OR 97207
Recommended Reading
The following titles are books dealing with early American armsmaking and are a good source of estate inventories, accounts and probate lists for those who do not have access to the original records or compilations. The titles listed are only a drop in the bucket however they are easily available and are quite informative.
Gill, Harold B. The Gunsmith in Colonial
Virginia. Charlottesville: University of Virginia Press, 1974.
Whisker, James B. Arms Makers of Colonial
America. Selinsgrove: Susquehanna University Press, 1992.
Whisker, James B. The Gunsmith's Trade.
Lewiston: The Edward Mellen Press, 1992.
Whisker, Bryan, Russo and McKnight. Gunsmiths
of the Carolinas, 1660-1870. Bedford: Old Bedford Village Press, 1994.
About the Author
Eric Kettenburg is an accomplished maker
of rifles and fowlers.
You can contact him at:
Eric Kettenburg
Tent City Road
RR1, Box 24
New Albany PA 18833.
Sidebar
Notes on Terminology Used
Gum Mastic, Mastic Tears: a somewhat clear resin of good flexibility which is exported from the Mediterranean-area (primarily Greece in the 20th century). Used in oil and spirit-varnishes, it is soluble in either medium.
Copal: nearly fifty types of copal resins are known, all with similarities but extracted from many different varieties of trees and even sometimes found in fossilized form (hardest). Exported from Africa, South America, the Far East, Manila, New Zealand etc. Soft copals were apparently quite common in the 18th and early 19th centuries.
Gum Benzoin: a very dark resin exported from Southern Asia. Somewhat soft and pliable (when incorporated into oil-varnishes), it has been used at least since the late 17th century. Apparently both oil and alcohol soluble.
Seedlac: a hard, amber-colored secretion of the "Lac-bug" before being heated and refined into shellac. Dissolved in alcohol, it is possessive an infinitely greater wear and weather-resistance than the various grades of shellac. Frequently used.
Dragon's Blood: a red resin obtained from various species of Palms grown in Africa. It is alcohol-soluble and has historically used to tint varnishes.
Turpentine: common gum or sap distilled from various conifers. The American hardware store-variety can be used, or if one wishes to spend more money the artist's grade Venice Turpentine can also serve!